云原生的一大应用场景就是 Devops 了,本篇就来介绍如何搭建一套 CI/CD 工作流环境。选择组件为 Kubernetes + Gitlab + ArgoCD。
准备
首先需要安装有一套可用的 k8s 环境,本地的环境如下:
| 主机名 |
系统 |
配置 |
ip 地址 |
版本 |
角色 |
| k8s-master |
CentOS7 |
2 core 8G |
192.168.2.21 |
v1.24.0 |
master,helm |
| k8s-node1 |
CentOS7 |
2 core 8G |
192.168.2.22 |
v1.24.0 |
node |
| k8s-node2 |
CentOS7 |
2 core 8G |
192.168.2.23 |
v1.24.0 |
node |
安装 Gitlab
gitlab 是开源的代码管理平台,可以看作是私有 github。因为官网的 helm 安装方式太复杂,这里选择使用 yaml 方式安装。这里参考这篇文章
gitlab 依赖 redis 和 postgresql 组件,需要外部存储。这里选择 gluster 作为 StorageClass,关于配置 gluster 作为 StorageClass 可以参考K8s 上搭建 harbor 私有库
创建 namespace
1
|
kubectl create namespace devops
|
添加 redis
 1
 2
 3
 4
 5
 6
 7
 8
 9
10
11
12
13
14
15
16
17
18
19
20
21
22
23
24
25
26
27
28
29
30
31
32
33
34
35
36
37
38
39
40
41
42
43
44
45
46
47
48
49
50
51
52
53
54
55
56
57
58
59
60
61
62
63
64
65
66
67
68
69
70
71
72
73
74
75
76
77
78
79
80
81
82
83
84
85
86
87
88
89
90
91
92
93
94
95
96
|
cat > gitlab-redis.yaml << EOF
## PVC
apiVersion: v1
kind: PersistentVolumeClaim
metadata:
  name: gitlab-redis-pvc
  namespace: devops
spec:
  accessModes:
  - ReadWriteOnce
  resources:
    requests:
      storage: 5Gi
  storageClassName: glusterfs
---
## Service
kind: Service
apiVersion: v1
metadata:
  name: gitlab-redis
  namespace: devops
  labels:
    name: gitlab-redis
spec:
  type: ClusterIP
  ports:
    - name: redis
      protocol: TCP
      port: 6379
      targetPort: redis
  selector:
    name: gitlab-redis
---
## Deployment
kind: Deployment
apiVersion: apps/v1
metadata:
  name: gitlab-redis
  namespace: devops
  labels:
    name: gitlab-redis
spec:
  replicas: 1
  selector:
    matchLabels:
      name: gitlab-redis
  template:
    metadata:
      name: gitlab-redis
      labels:
        name: gitlab-redis
    spec:
      containers:
      - name: gitlab-redis
        image: 'sameersbn/redis:4.0.9-3'
        ports:
        - name: redis
          containerPort: 6379
          protocol: TCP
        resources:
          limits:
            cpu: 1000m
            memory: 2Gi
          requests:
            cpu: 1000m
            memory: 2Gi
        volumeMounts:
          - name: data
            mountPath: /var/lib/redis
        livenessProbe:
          exec:
            command:
              - redis-cli
              - ping
          initialDelaySeconds: 5
          timeoutSeconds: 5
          periodSeconds: 10
          successThreshold: 1
          failureThreshold: 3
        readinessProbe:
          exec:
            command:
              - redis-cli
              - ping
          initialDelaySeconds: 5
          timeoutSeconds: 5
          periodSeconds: 10
          successThreshold: 1
          failureThreshold: 3
      volumes:
      - name: data
        persistentVolumeClaim:
          claimName: gitlab-redis-pvc
EOF

kubectl apply -f gitlab-redis.yaml
|
添加 postgresql
  1
  2
  3
  4
  5
  6
  7
  8
  9
 10
 11
 12
 13
 14
 15
 16
 17
 18
 19
 20
 21
 22
 23
 24
 25
 26
 27
 28
 29
 30
 31
 32
 33
 34
 35
 36
 37
 38
 39
 40
 41
 42
 43
 44
 45
 46
 47
 48
 49
 50
 51
 52
 53
 54
 55
 56
 57
 58
 59
 60
 61
 62
 63
 64
 65
 66
 67
 68
 69
 70
 71
 72
 73
 74
 75
 76
 77
 78
 79
 80
 81
 82
 83
 84
 85
 86
 87
 88
 89
 90
 91
 92
 93
 94
 95
 96
 97
 98
 99
100
|
cat > gitlab-pgsql.yaml << EOF
## PVC
apiVersion: v1
kind: PersistentVolumeClaim
metadata:
  name: gitlab-pg-pvc
  namespace: devops
spec:
  accessModes:
  - ReadWriteOnce
  resources:
    requests:
      storage: 10Gi
  storageClassName: glusterfs
---
## Service
kind: Service
apiVersion: v1
metadata:
  name: gitlab-postgresql
  namespace: devops
  labels:
    name: gitlab-postgresql
spec:
  ports:
    - name: postgres
      protocol: TCP
      port: 5432
      targetPort: postgres
  selector:
    name: postgresql
  type: ClusterIP
---
## Deployment
kind: Deployment
apiVersion: apps/v1
metadata:
  name: postgresql
  namespace: devops
  labels:
    name: postgresql
spec:
  replicas: 1
  selector:
    matchLabels:
      name: postgresql
  template:
    metadata:
      name: postgresql
      labels:
        name: postgresql
    spec:
      containers:
      - name: postgresql
        image: sameersbn/postgresql:12-20200524
        ports:
        - name: postgres
          containerPort: 5432
        env:
        - name: DB_USER
          value: gitlab
        - name: DB_PASS
          value: admin@howlinkdev
        - name: DB_NAME
          value: gitlabhq_production
        - name: DB_EXTENSION
          value: 'pg_trgm,btree_gist'
        resources:
          requests:
            cpu: 2
            memory: 2Gi
          limits:
            cpu: 2
            memory: 2Gi
        livenessProbe:
          exec:
            command: ["pg_isready","-h","localhost","-U","postgres"]
          initialDelaySeconds: 30
          timeoutSeconds: 5
          periodSeconds: 10
          successThreshold: 1
          failureThreshold: 3
        readinessProbe:
          exec:
            command: ["pg_isready","-h","localhost","-U","postgres"]
          initialDelaySeconds: 5
          timeoutSeconds: 1
          periodSeconds: 10
          successThreshold: 1
          failureThreshold: 3
        volumeMounts:
        - name: data
          mountPath: /var/lib/postgresql
      volumes:
      - name: data
        persistentVolumeClaim:
          claimName: gitlab-pg-pvc
EOF

kubectl apply -f gitlab-pgsql.yaml
|
最后就是安装 gitlab
  1
  2
  3
  4
  5
  6
  7
  8
  9
 10
 11
 12
 13
 14
 15
 16
 17
 18
 19
 20
 21
 22
 23
 24
 25
 26
 27
 28
 29
 30
 31
 32
 33
 34
 35
 36
 37
 38
 39
 40
 41
 42
 43
 44
 45
 46
 47
 48
 49
 50
 51
 52
 53
 54
 55
 56
 57
 58
 59
 60
 61
 62
 63
 64
 65
 66
 67
 68
 69
 70
 71
 72
 73
 74
 75
 76
 77
 78
 79
 80
 81
 82
 83
 84
 85
 86
 87
 88
 89
 90
 91
 92
 93
 94
 95
 96
 97
 98
 99
100
101
102
103
104
105
106
107
108
109
110
111
112
113
114
115
116
117
118
119
120
121
122
123
124
125
126
127
128
129
130
131
132
133
134
135
136
137
138
139
140
141
142
143
144
145
146
147
|
cat > gitlab.yaml << EOF
## PVC
apiVersion: v1
kind: PersistentVolumeClaim
metadata:
  name: gitlab-pvc
  namespace: devops
spec:
  accessModes:
  - ReadWriteOnce
  resources:
    requests:
      storage: 30Gi
  storageClassName: glusterfs
---
## Service
kind: Service
apiVersion: v1
metadata:
  name: gitlab
  namespace: devops
  labels:
    name: gitlab
spec:
  ports:
    - name: http
      protocol: TCP
      port: 80
    - name: ssh
      protocol: TCP
      port: 22
  selector:
    name: gitlab
  type: ClusterIP
---
## Deployment
kind: Deployment
apiVersion: apps/v1
metadata:
  name: gitlab
  namespace: devops
  labels:
    name: gitlab
spec:
  replicas: 1
  selector:
    matchLabels:
      name: gitlab
  template:
    metadata:
      name: gitlab
      labels:
        name: gitlab
    spec:
      containers:
      - name: gitlab
        image: 'sameersbn/gitlab:13.6.2'
        ports:
        - name: ssh
          containerPort: 22
        - name: http
          containerPort: 80
        - name: https
          containerPort: 443
        env:
        - name: TZ
          value: Asia/Shanghai
        - name: GITLAB_TIMEZONE
          value: Beijing
        - name: GITLAB_SECRETS_DB_KEY_BASE
          value: long-and-random-alpha-numeric-string
        - name: GITLAB_SECRETS_SECRET_KEY_BASE
          value: long-and-random-alpha-numeric-string
        - name: GITLAB_SECRETS_OTP_KEY_BASE
          value: long-and-random-alpha-numeric-string
        - name: GITLAB_ROOT_PASSWORD
          value: admin@howlinkdev
        - name: GITLAB_ROOT_EMAIL
          value: 598223084@qq.com
        - name: GITLAB_HOST
          value: 'gitlab.howlinkdev.com'
        - name: GITLAB_PORT
          value: '80'
        - name: GITLAB_SSH_PORT
          value: '22'
        - name: GITLAB_NOTIFY_ON_BROKEN_BUILDS
          value: 'true'
        - name: GITLAB_NOTIFY_PUSHER
          value: 'false'
        - name: DB_TYPE
          value: postgres
        - name: DB_HOST
          value: gitlab-postgresql
        - name: DB_PORT
          value: '5432'
        - name: DB_USER
          value: gitlab
        - name: DB_PASS
          value: admin@howlinkdev
        - name: DB_NAME
          value: gitlabhq_production
        - name: REDIS_HOST
          value: gitlab-redis
        - name: REDIS_PORT
          value: '6379'
        resources:
          requests:
            cpu: 2
            memory: 4Gi
          limits:
            cpu: 2
            memory: 4Gi
        livenessProbe:
          httpGet:
            path: /
            port: 80
            scheme: HTTP
          initialDelaySeconds: 400
          timeoutSeconds: 15
          periodSeconds: 10
          successThreshold: 1
          failureThreshold: 5
        readinessProbe:
          httpGet:
            path: /
            port: 80
            scheme: HTTP
          initialDelaySeconds: 10
          timeoutSeconds: 30
          periodSeconds: 10
          successThreshold: 1
          failureThreshold: 5
        volumeMounts:
        - name: data
          mountPath: /home/git/data
        - name: localtime
          mountPath: /etc/localtime
      volumes:
      - name: data
        persistentVolumeClaim:
          claimName: gitlab-pvc
      - name: localtime
        hostPath:
          path: /etc/localtime
EOF

kubectl apply -f gitlab.yaml
|
注: postgresql 和 gitlab 都是需要一段时间初始化,所以安装过程中可能会保证重试,这是正常情况。

使用 ingress 方式对外提供服务
添加证书配置文件
 1
 2
 3
 4
 5
 6
 7
 8
 9
10
11
12
13
14
15
16
17
18
19
20
21
22
23
|
# vim ssl/openssl.cnf
# ca根证书配置
[ ca ]
subjectKeyIdentifier=hash
authorityKeyIdentifier=keyid:always,issuer
basicConstraints = critical,CA:true

# HTTPS应用证书配置
[ crt ]
subjectKeyIdentifier = hash
authorityKeyIdentifier=keyid:always,issuer
basicConstraints = critical, CA:false
keyUsage = critical, digitalSignature, cRLSign, keyEncipherment
extendedKeyUsage = critical, serverAuth, clientAuth
subjectAltName=@alt_names

# SANs可以将一个证书给多个域名或IP使用
# 访问的域名或IP必须包含在此,否则无效
# 修改为你要保护的域名或者IP地址,支持通配符
[alt_names]
DNS.1 = howlinkdev.com
DNS.2 = gitlab.howlinkdev.com
IP.1 = 192.168.2.21
|
添加证书
 1
 2
 3
 4
 5
 6
 7
 8
 9
10
|
cd ssl
# 生成根证书
openssl genrsa -out root.key 2048
openssl req -new -key root.key  -out root.csr -subj "/C=CN/ST=Zhejiang/L=Wenzhou/O=howlink/OU=howlink/CN=howlinkdev.com"
openssl x509 -req -extfile openssl.cnf -extensions ca -in root.csr -out root.crt -signkey root.key -CAcreateserial -days 3650

# 生成 harbor 应用证书
openssl genrsa -out gitlab.key 2048
openssl req -new -key gitlab.key -out gitlab.csr -subj "/C=CN/ST=Zhejiang/L=Wenzhou/O=howlink/OU=howlink/CN=gitlab.howlinkdev.com"
openssl x509 -req -extfile openssl.cnf -extensions crt -CA root.crt -CAkey root.key -CAserial gitlab.srl -CAcreateserial -in gitlab.csr -out gitlab.crt -days 3650
|
创建 secret
1
|
kubectl create secret tls tls-gitlab --cert=gitlab.crt --key=gitlab.key -n devops
|
添加 ingress 配置文件
 1
 2
 3
 4
 5
 6
 7
 8
 9
10
11
12
13
14
15
16
17
18
19
20
21
22
23
24
25
26
27
28
29
30
|
cat > gitlab-ingress.yaml << EOF
apiVersion: networking.k8s.io/v1
kind: Ingress
metadata:
  annotations:
    ingress.kubernetes.io/ssl-redirect: "true"
    kubernetes.io/ingress.class: nginx
  name: gitlab-ingress
  namespace: devops
spec:
  rules:
  - host: gitlab.howlinkdev.com
    http:
      paths:
      - backend:
          service:
            name: gitlab
            port:
              number: 80
        path: /
        pathType: Prefix
  tls:
  - hosts:
    - gitlab.howlinkdev.com
    secretName: tls-gitlab
status:
  loadBalancer: {}
EOF

kubectl apply -f github-ingress.yaml
|
因为 gitlab.howlinkdev.com 是自定义域名,客户端访问这个域名需要 DNS 解析,可以选择以下方式:
- 在内部环境中添加 DNS 服务记录
- 直接修改 k8s coredns 配置文件并修改本地 /etc/hosts 文件
这里选择第二种方式,修改 coredns
 1
 2
 3
 4
 5
 6
 7
 8
 9
10
11
12
13
14
15
16
17
18
19
20
21
22
23
24
25
26
27
28
29
30
31
32
33
34
35
36
37
|
# kubectl edit cm coredns -n kube-system
apiVersion: v1
data:
  Corefile: |
    .:53 {
        log
        errors
        health {
           lameduck 5s
        }
        ready
        kubernetes cluster.local in-addr.arpa ip6.arpa {
           pods insecure
           fallthrough in-addr.arpa ip6.arpa
           ttl 30
        }
        hosts {
           # 直接添加这条记录
           192.168.2.21 gitlab.howlinkdev.com
           fallthrough
        }
        prometheus :9153
        forward . /etc/resolv.conf {
           max_concurrent 1000
        }
        cache 30
        reload
        loop
        loadbalance
    }
kind: ConfigMap
metadata:
  creationTimestamp: "2022-05-30T02:29:32Z"
  name: coredns
  namespace: kube-system
  resourceVersion: "538951"
  uid: 702890ed-fb08-443e-9ce2-f28dac4ec9b4
|
修改本地 /etc/hosts
1
2
3
|
# /etc/hosts

192.168.2.21 gitlab.howlinkdev.com
|
设置完成后就可以直接使用浏览器访问 https://gitlab.howlinkdev.com,初始用户名密码为 root/admin@howlinkdev.com (可以在 gitlab.yaml 直接修改初始密码)

安装 gitlab-runner
gitlab CI 工作流需要外部 runner,这里选择 gitlab-runner。
使用 helm 方式安装 gitlab-runner,先下载仓库
1
2
|
helm show gitlab/gitlab-runner values
helm repo update
|
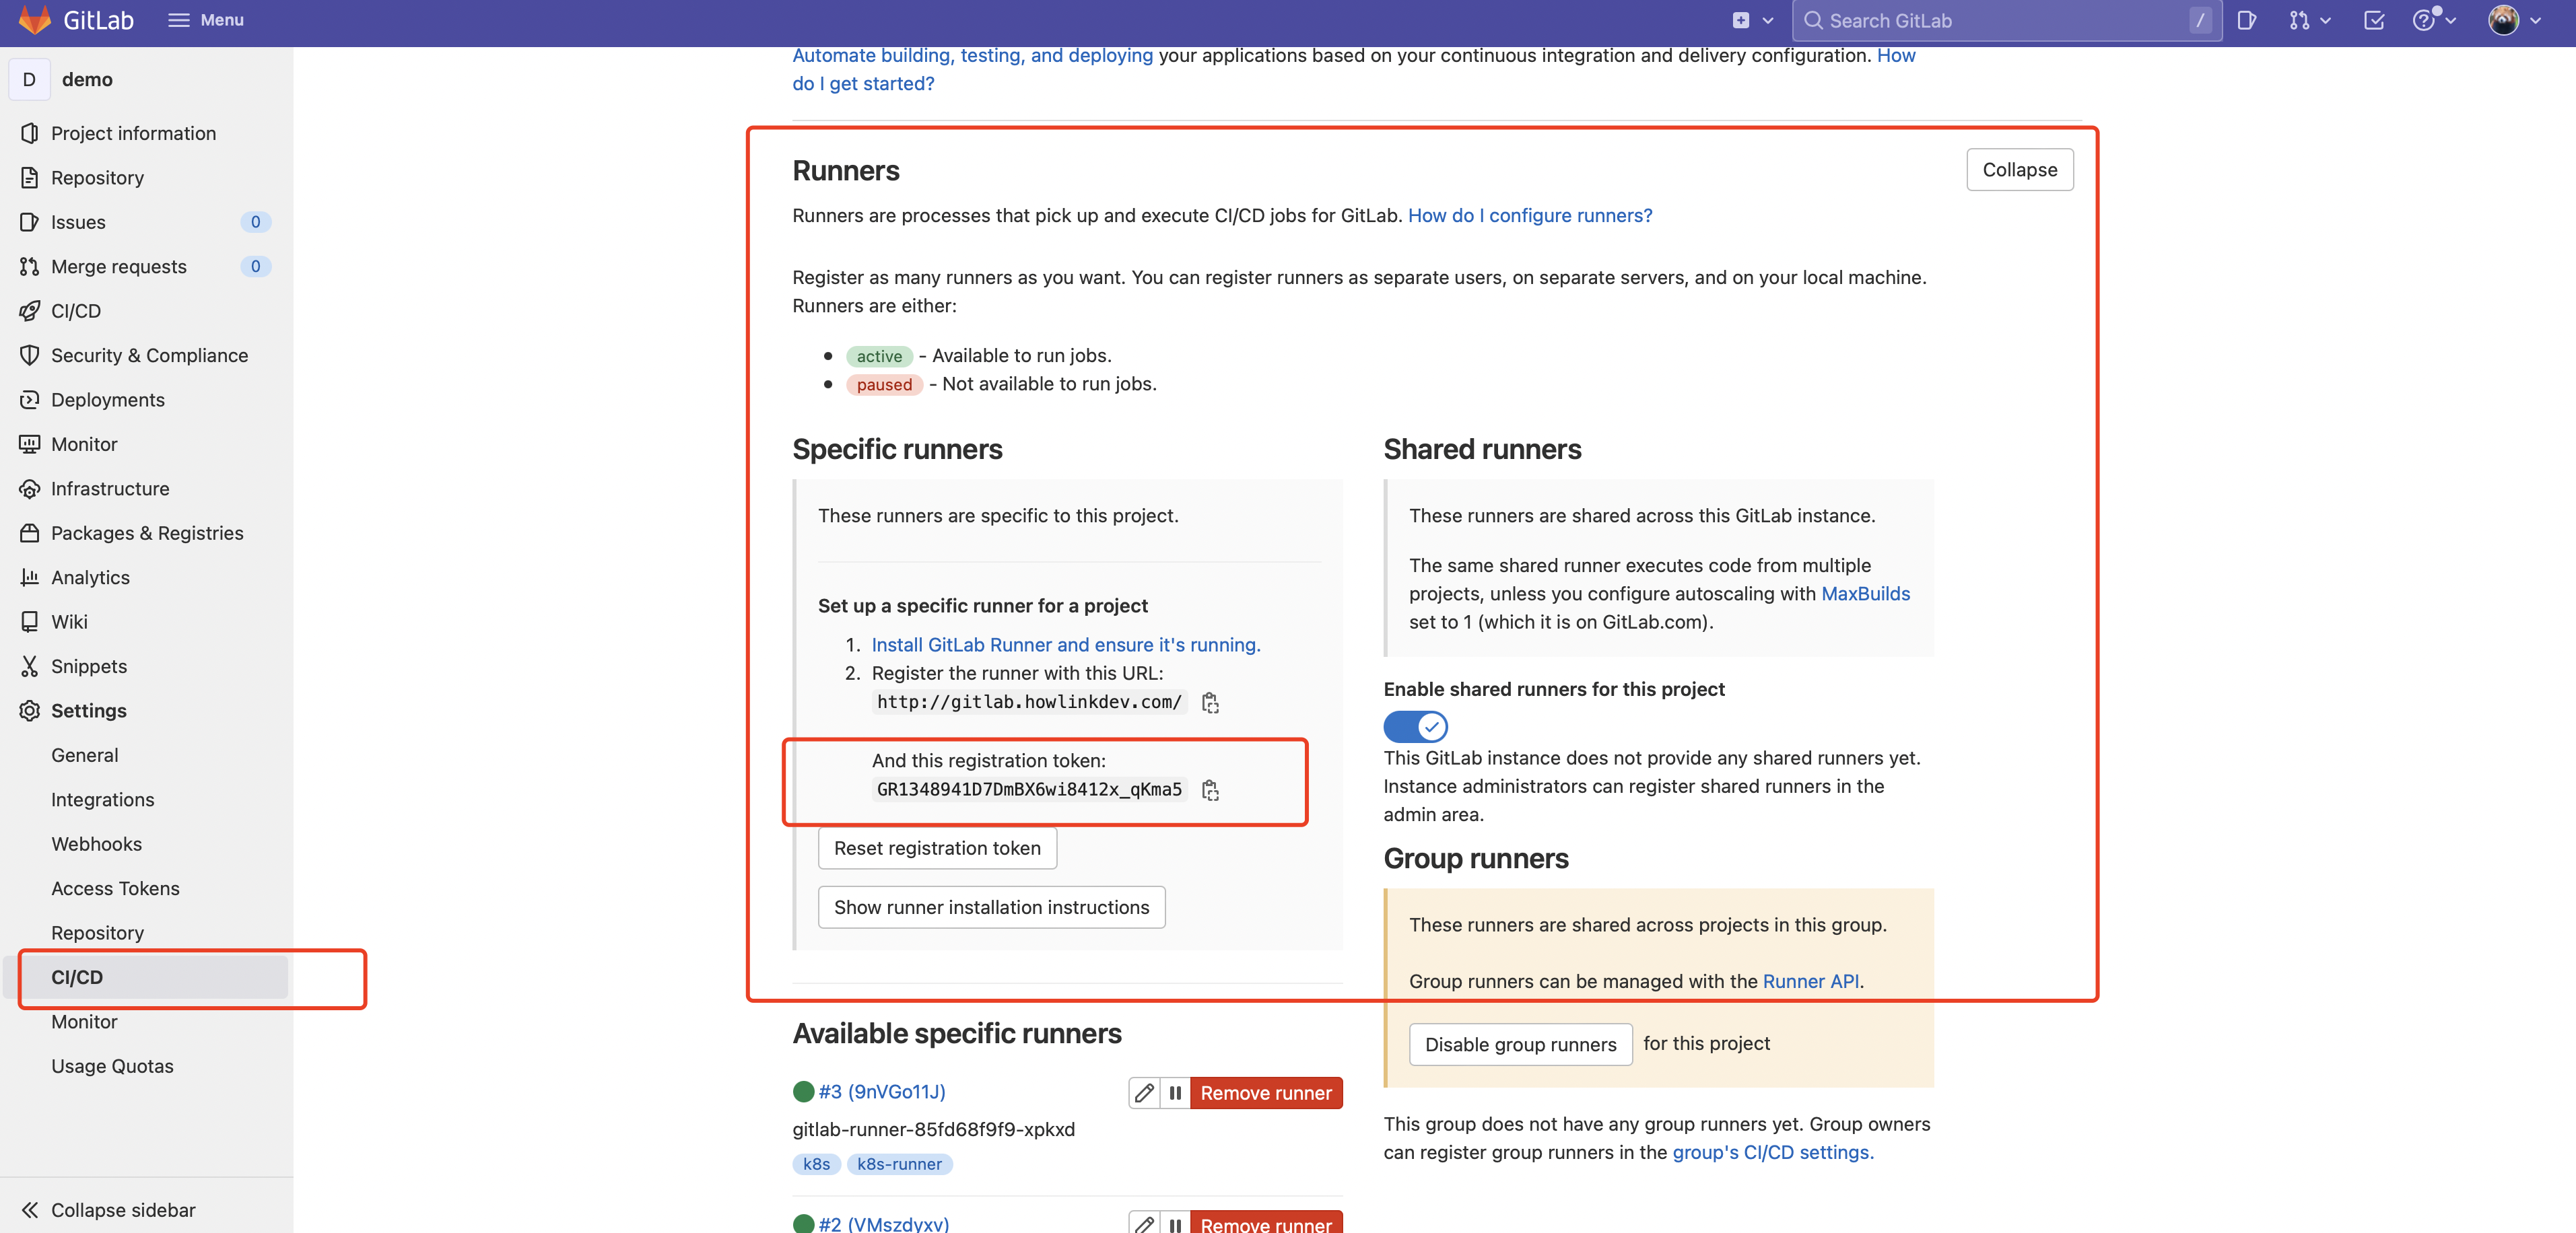
修改配置文件,先从 gitlab 上复制 registration token。Settings -> CI/CD -> Runners

 1
 2
 3
 4
 5
 6
 7
 8
 9
10
11
12
13
14
15
16
17
18
19
20
21
22
23
24
25
26
27
28
29
30
31
32
33
34
35
36
37
38
39
40
41
42
43
44
45
46
47
48
49
50
51
52
53
54
55
56
57
58
59
60
61
62
63
64
65
66
|
cat > gitlab-runner-value.yaml << EOF
imagePullPolicy: IfNotPresent
#gitlab服务器地址
gitlabUrl: http://gitlab.howlinkdev.com
#runner注册token
runnerRegistrationToken: "GR1348941D7DmBX6wi8412x_qKma5"
#当停止管道时等待其他作业终止时间
terminationGracePeriodSeconds: 3600
#最大并发作业数量
concurrent: 10
#新作业检查时隔
checkInterval: 30
sessionServer:
  enabled: false
rbac:
  create: true
  resources: ["*"]
  verbs: ["*"]
  rules: []
  clusterWideAccess: false
  podSecurityPolicy:
    enabled: false
    resourceNames:
    - gitlab-runner
metrics:
  enabled: true
  portName: metrics
  port: 9252
  serviceMonitor:
    enabled: false
service:
  enabled: false
  type: ClusterIP
runners:
  config: |
    [[runners]]
      [runners.kubernetes]
        namespace = "{{.Release.Namespace}}"
        image = "ubuntu:16.04"
  #执行器类型
  executor: kubernetes
  #是否锁定false
  locked: false
  #你的tags
  tags: "k8s-runner,k8s"
  #是否运行没有标签的项目
  runUntagged: true
  #开启docker in docker
  privileged: true
  cache: {}
  builds: {}
  services: {}
  helpers: {}
securityContext:
  runAsUser: 100
  fsGroup: 65533
resources: {}
affinity: {}
nodeSelector: {}
tolerations: []
hostAliases: []
podAnnotations: {}
podLabels: {}
secrets: []
configMaps: {}
EOF
|
安装 gitlab-runner
1
|
helm install gitlab/gitlab-runner -n devops -f gitlab-runner-value.yaml
|
安装 ArgoCD
使用 helm 安装 argocd,先添加 helm repo
1
2
3
4
|
helm repo add argo https://argoproj.github.io/argo-helm
helm repo update

helm pull argo/argo-cd --untar
|
修改 helm argo-cd 配置文件 values.yaml
 1
 2
 3
 4
 5
 6
 7
 8
 9
10
11
12
13
14
15
16
17
18
19
|
server:
  ingress:
    enabled: true
    annotations:
      kubernetes.io/ingress.class: "nginx"
      nginx.ingress.kubernetes.io/force-ssl-redirect: "true"
      nginx.ingress.kubernetes.io/ssl-passthrough: "true"
      nginx.ingress.kubernetes.io/backend-protocol: "HTTPS"

    hosts:
      - argo.howlinkdev.com
    paths:
      - /
    pathType: Prefix
    tls:
      - secretName: tls-argo
        hosts:
          - argo.howlinkdev.com
    https: true
|
添加 ssl 证书
1
2
3
|
openssl genrsa -out argo.key 2048
openssl req -new -key argo.key -out argo.csr -subj "/C=CN/ST=Zhejiang/L=Wenzhou/O=howlink/OU=howlink/CN=argo.howlinkdev.com"
openssl x509 -req -extfile openssl.cnf -extensions crt -CA root.crt -CAkey root.key -CAserial argo.srl -CAcreateserial -in argo.csr -out argo.crt -days 3650
|
添加 secret
1
|
kubectl create secret tls tls-argo --cert=argo.crt --key=argo.key -n devops
|
安装 argo-cd
1
|
helm install argo argo-cd -n devops
|

根据 helm 的输出获取 argo 的登录密码
1
2
|
# kubectl -n devops get secret argocd-initial-admin-secret -o jsonpath="{.data.password}" | base64 -d
aiaWM7zIqP18vxSC
|
参考 gitlab,修改 DNS 记录,使用浏览器访问 https://argo.howlinkdev.com,用户名密码为 admin/aiaWM7zIqP18vxSC

配置 CI/CD
gitlab 配置
这里我们创建一个 Golang 的实例项目,功能是在首页显示 pod 名称和系统版本,项目地址在此。先将这个
项目上传到 gitlab 上,地址为 http://gitlab.howlinkdev.com/gitops/demo。
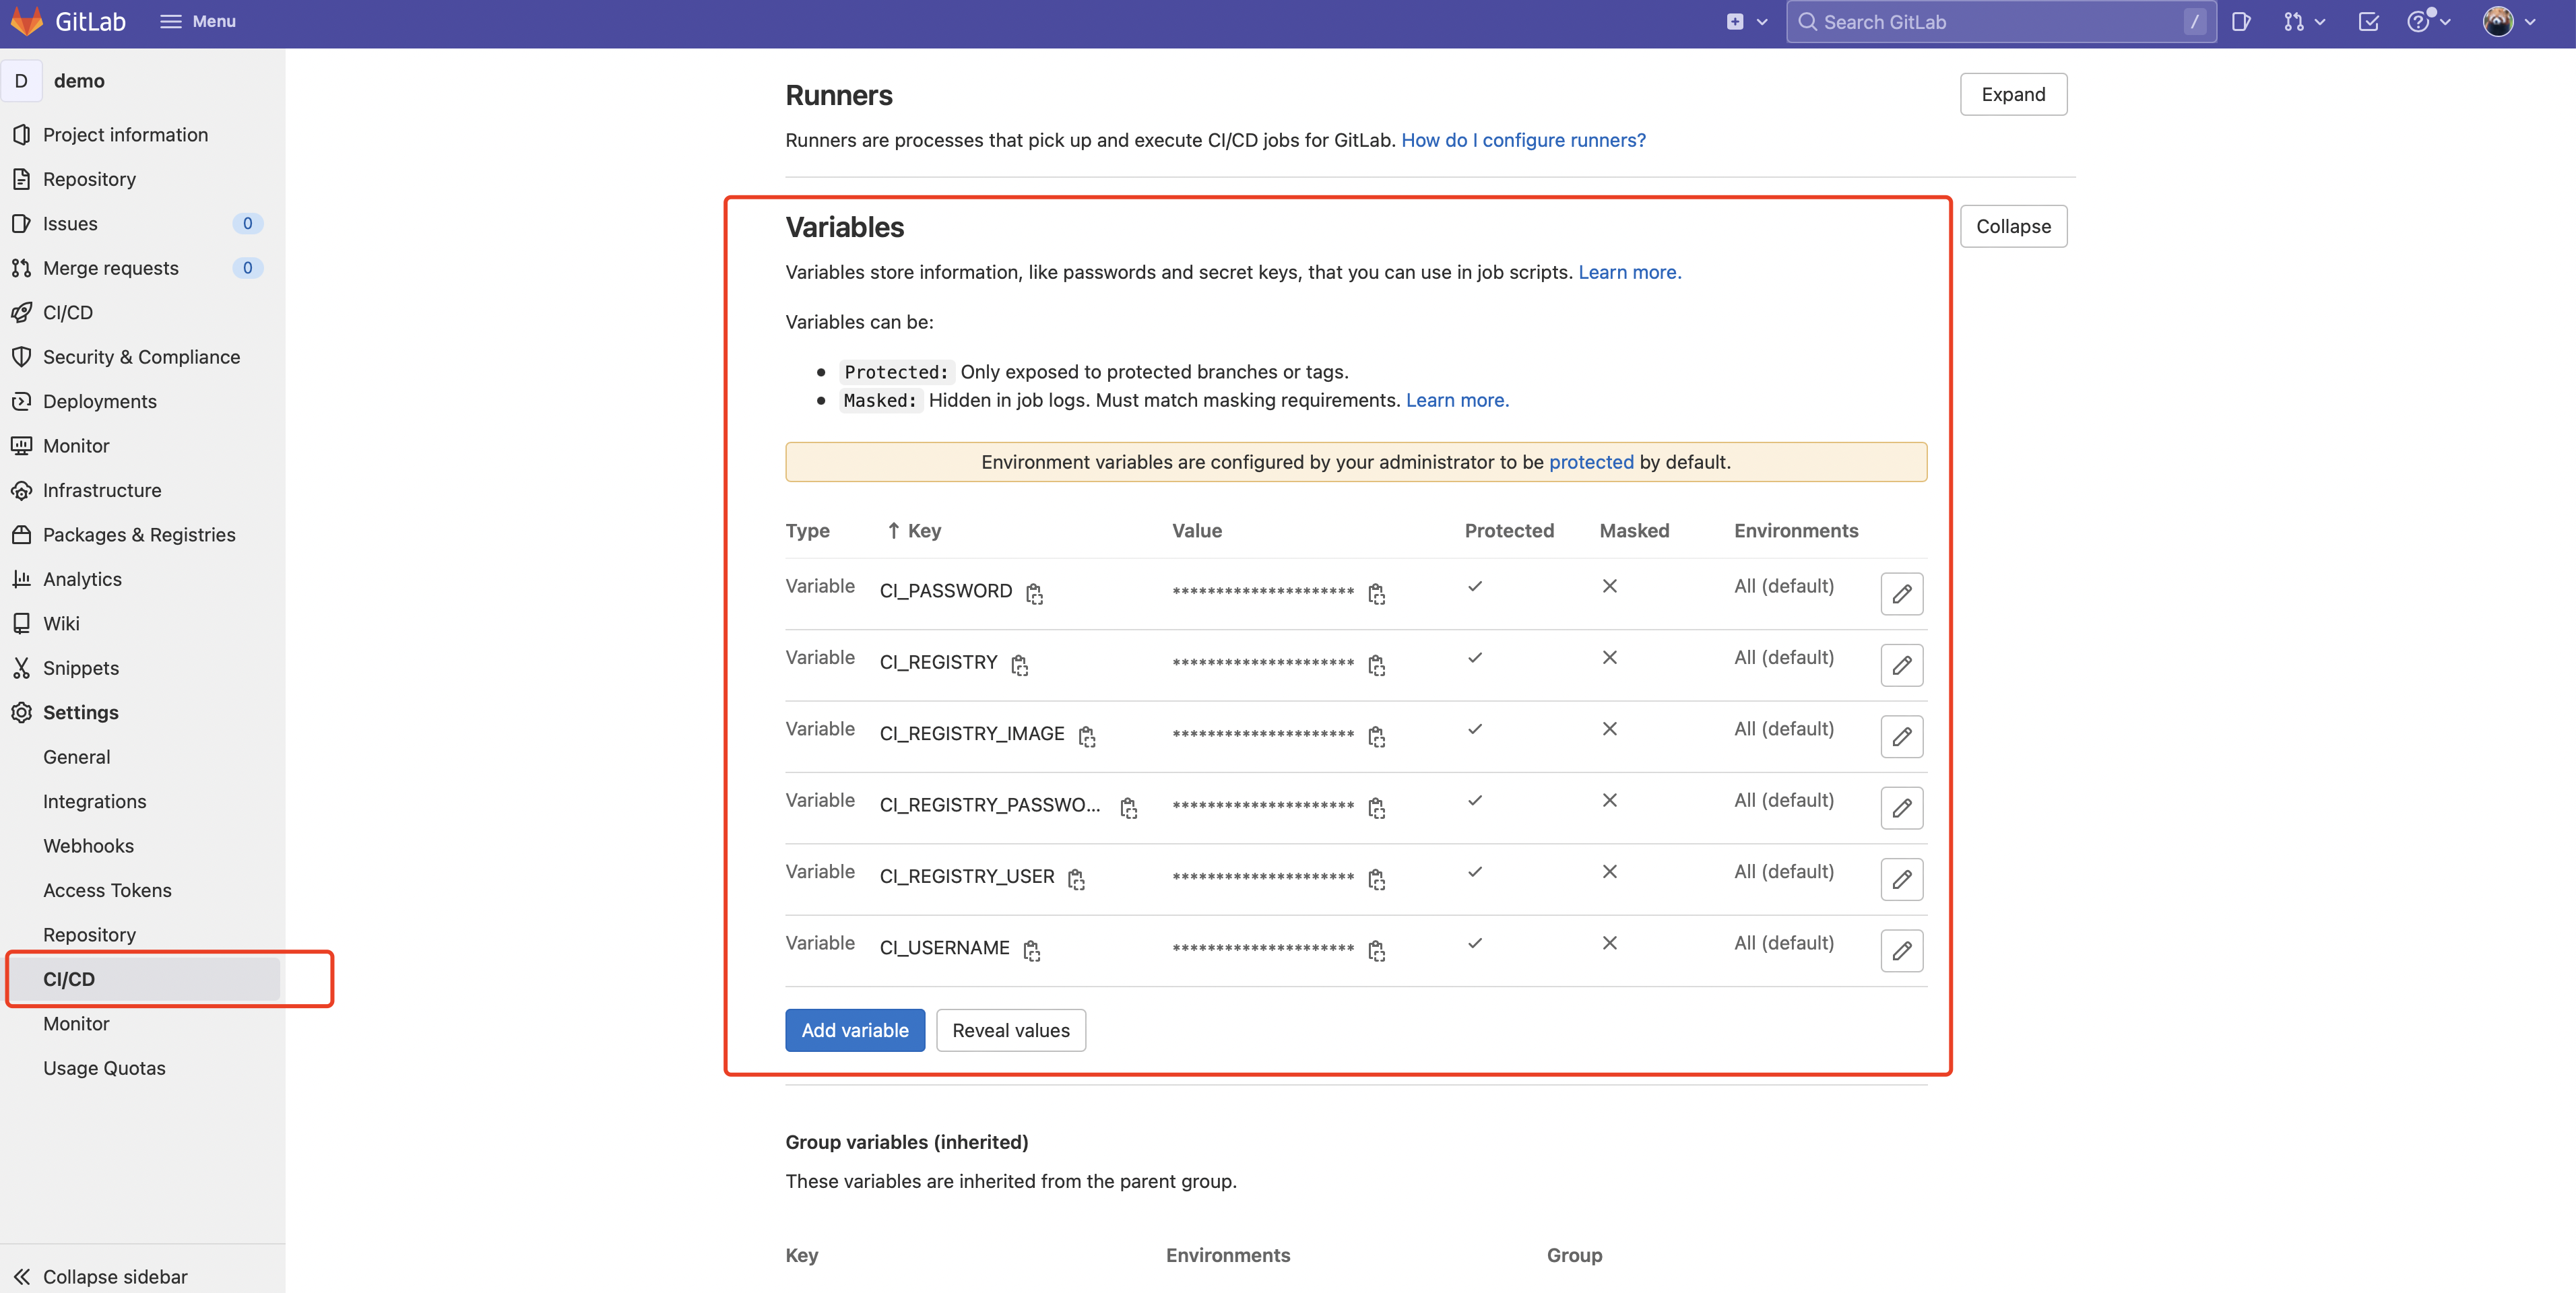
接着设置环境变量 Settings -> CI/CD -> Variables:
| variable |
说明 |
| CI_REGISTRY |
镜像仓库地址,我们选择 harbor 私有仓库,值为:https://harbor.howlikdev.com |
| CI_REGISTRY_IMAGE |
镜像名称,值为:harbor.howlinkdev.com/gitops/demo |
| CI_REGISTRY_USER |
harbor 仓库用户名,这里需要在 harbor 创建一个机器人账号,值为 robot$$cicd (harbor 机器人账号格式为前缀为 robot$,$需要使用 $$ 代替) |
| CI_REGISTRY_PASSWORD |
harbor 仓库密码 |
| CI_PASSWORD |
Git 仓库访问密码,如果密码是纯文本,则可以正常工作,但如果密码具有感叹号等特殊字符,则需要使用 URL 编码 |
| CI_USERNAME |
Git 仓库访问用户名 |

ArgoCD 配置
Argo CD 自带了一套 CRD 对象,可以用来进行声明式配置,这当然也是推荐的方式,把我们的基础设施作为代码来进行托管,下面是我们为开发和生产两套环境配置的资源清单:
 1
 2
 3
 4
 5
 6
 7
 8
 9
10
11
12
13
14
15
16
17
18
19
20
21
22
23
24
25
26
27
28
29
30
31
32
33
34
35
36
37
38
|
cat > gitops-demo.yaml << EOF
# gitops-demo-app.yaml
apiVersion: argoproj.io/v1alpha1
kind: Application
metadata:
  name: demo-dev
  namespace: devops
spec:
  project: default
  source:
    repoURL: http://gitlab.howlinkdev.com/gitops/demo.git
    targetRevision: HEAD
    path: deployment/dev
  destination:
    server: https://kubernetes.default.svc
    namespace: dev
  syncPolicy:
    automated:
      prune: true
---
apiVersion: argoproj.io/v1alpha1
kind: Application
metadata:
  name: demo-prod
  namespace: devops
spec:
  project: default
  source:
    repoURL: http://gitlab.howlinkdev.com/gitops/demo.git
    targetRevision: HEAD
    path: deployment/prod
  destination:
    server: https://kubernetes.default.svc
    namespace: prod
  syncPolicy:
    automated:
      prune: true
EOF
|
上面定义的 Application 这个资源,就是 Argo CD 用于描述应用的 CRD 对象:
name:Argo CD 应用程序的名称
project:应用程序将被配置的项目名称,这是在 Argo CD 中应用程序的一种组织方式
repoURL:源代码的仓库地址
targetRevision:想要使用的 git 分支
path:Kubernetes 资源清单在仓库中的路径
destination:Kubernetes 集群中的目标,server 固定为 https://kubernetes.default.svc
应用这个 yaml 文件会生成两个 Application
1
2
3
4
5
6
7
|
$ kubectl apply -f gitops-demo.yaml
application.argoproj.io/demo-dev created
application.argoproj.io/demo-prod created
$ kubectl get app -n devops
NAME        SYNC STATUS   HEALTH STATUS
demo-dev    Synced        Healthy
demo-prod   Synced        Healthy
|
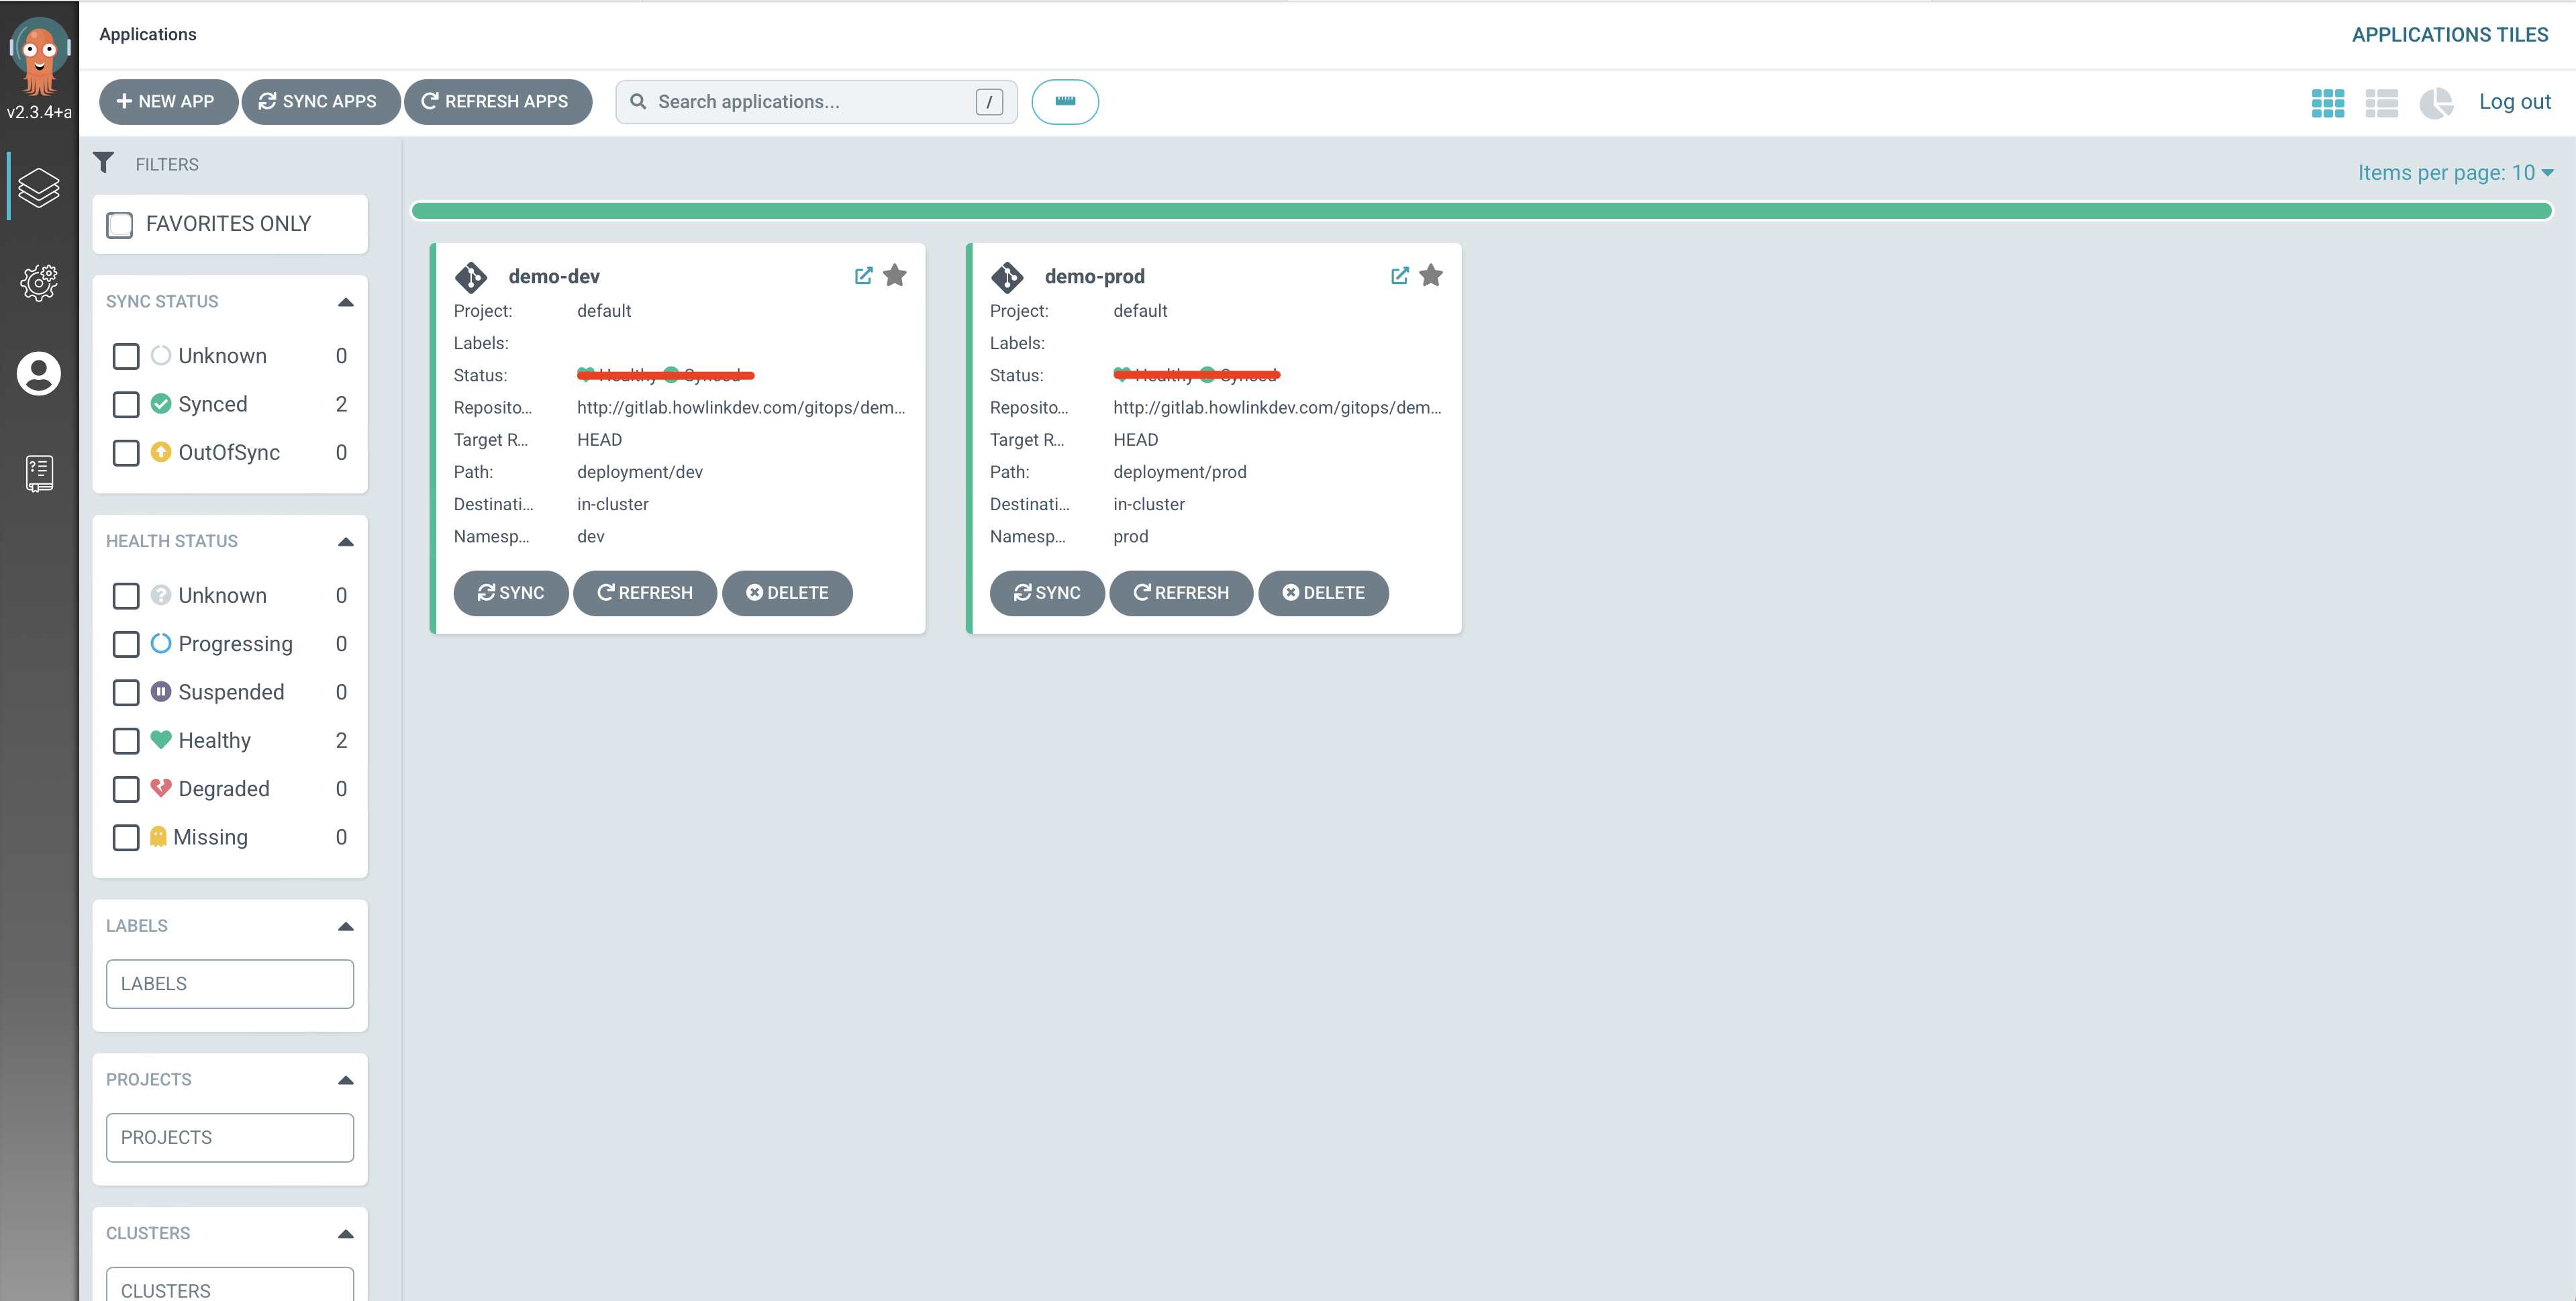
同时可以在 Argo CD Dashboard 上看到 Application 的同步信息

点击其中一个就可以看到关于应用的详细信息,我们可以在 gitops/demo 代码仓库的 deployment/ 目录里面找到资源对象。我们可以看到,在每个文件夹下面都有一个 kustomization.yaml 文件,Argo CD 可以识别它,不需要任何其他的设置就可以使用。
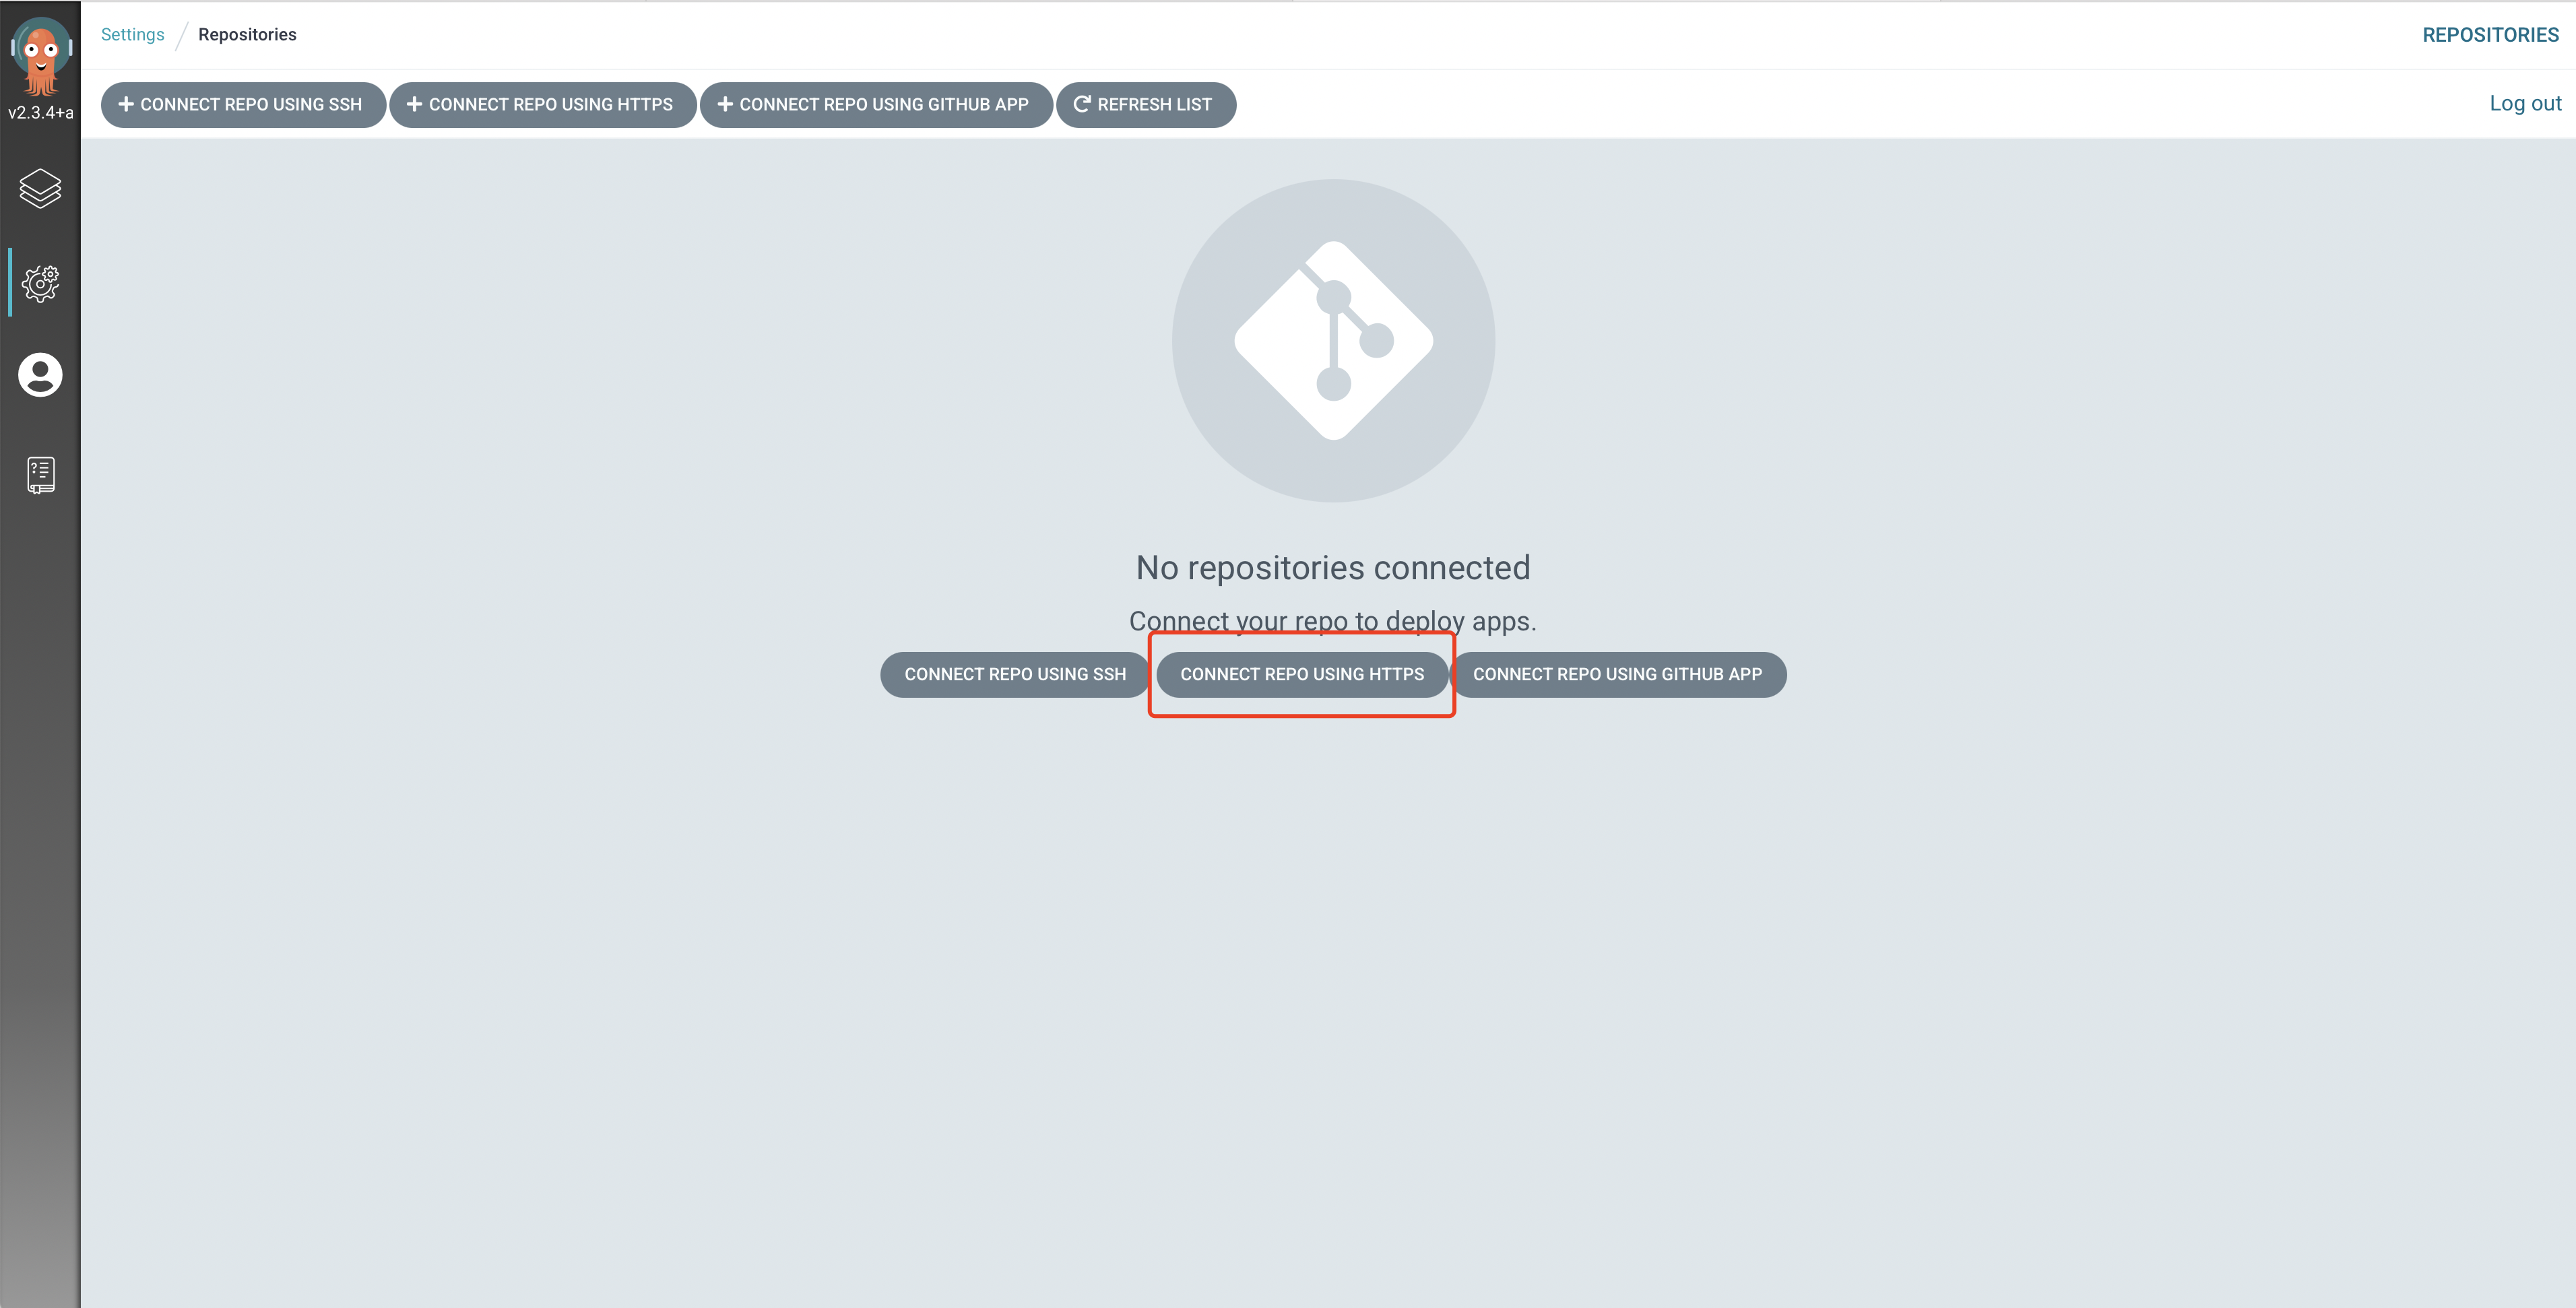
由于我们这里的代码仓库是私有的 GitLab,所以我们还需要配置对应的仓库地址,在页面上 Settings -> Repositories,点击 CONNECTI REPO USING HTTPS 按钮:

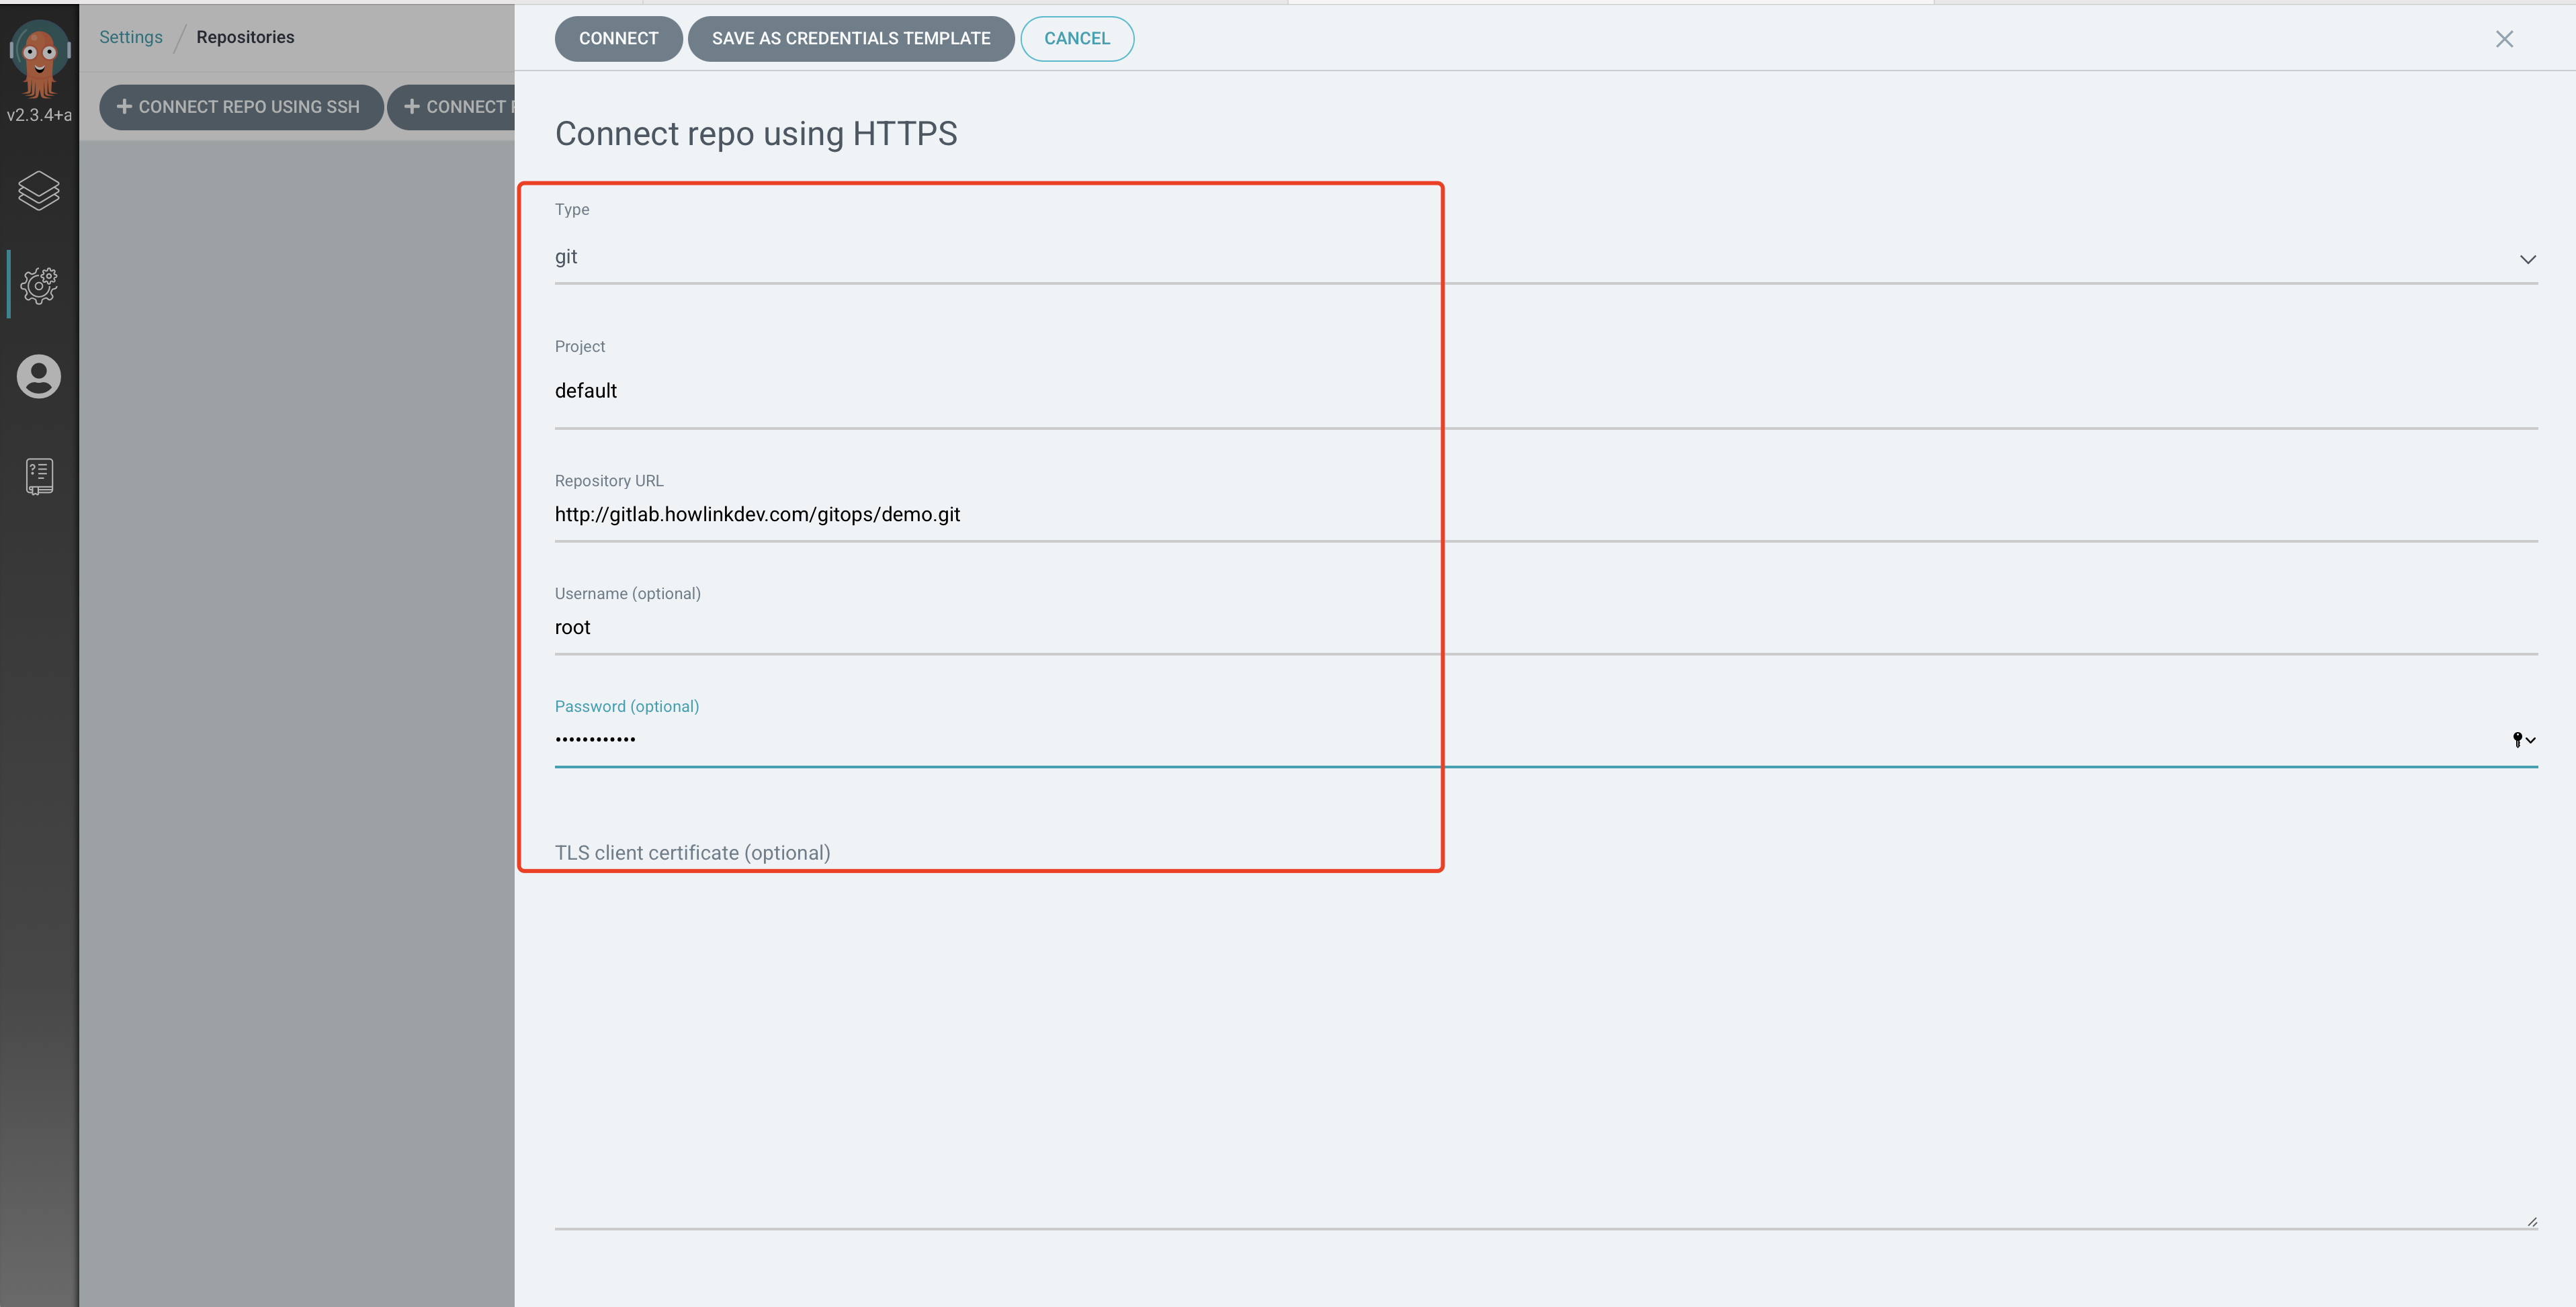
添加代码认证信息

如果使用的是 HTTPS,所以我们需要勾选下方的 Skip server verification,然后点击上方的 CONNECT 按钮添加即可。然后重新同步上面的两个 Application,就可以看到正常的状态了。
在 http://gitlab.howlinkdev.com/gitops/demo 项目的 deployment 目录下存放这
配置 Gitlab CI 流水线
接下来我们需要为应用程序创建流水线,自动构建我们的应用程序,推送到镜像仓库,然后更新 Kubernetes 的资源清单文件。
开发人员在自己的分支上开发代码,他们分支的每一次提交都会触发一个阶段性的构建,当他们将自己的修改和主分支合并时,完整的流水线就被触发。将构建应用程序,打包成容器镜像,将镜像推送到 harbor 仓库,并自动更新 Kubernetes 资源清单。
GitLab CI 中的流水线默认定义在代码仓库根目录下的 .gitlab-ci.yml 文件中,在改文件的最上面定义了一些构建阶段和环境变量、镜像以及一些前置脚本:
1
2
3
4
5
|
stages:
- build
- publish
- deploy-dev
- deploy-prod
|
接下来是阶段的定义和所需的任务声明。我们这里的构建过程比较简单,只需要在一个 golang 镜像中执行一个构建命令即可,然后将编译好的二进制文件保存到下一个阶段处理,这一个阶段适合分支的任何变更:
 1
 2
 3
 4
 5
 6
 7
 8
 9
10
11
|
build:
  stage: build
  image:
    name: golang:1.18.2
  script:
    - go build -o main main.go
  artifacts:
    paths:
      - main
  variables:
    CGO_ENABLED: 0
|
然后就是构建镜像并推送到镜像仓库,这里我们使用 Kaniko,当然也可以使用 DinD 模式进行构建,只是安全性不高,这里我们可以使用 GIT 提交的 commit 哈希值作为镜像 tag,关于 Docker 镜像仓库的认证和镜像地址信息可以通过项目的参数来进行传递,不过这个阶段只在主分支发生变化时才会触发:
 1
 2
 3
 4
 5
 6
 7
 8
 9
10
11
12
13
14
15
16
17
18
19
20
21
22
23
|
publish:
  stage: publish
  image:
    name: cnych/kaniko-executor:debug
    entrypoint: [""]
  script:
    - mkdir -p /kaniko/.docker
    - echo "{\"auths\":{\"$CI_REGISTRY\":{\"username\":\"$CI_REGISTRY_USER\",\"password\":\"$CI_REGISTRY_PASSWORD\"}}}" > /kaniko/.docker/config.json
    - cat /kaniko/.docker/config.json
    - echo $PROJECT_DIR
    - echo $REGISTRY_IMAGE:$COMMIT_SHORT_SHA
    - >-
      /kaniko/executor
      --insecure --skip-tls-verify
      --context $CI_PROJECT_DIR
      --dockerfile ./Dockerfile
      --reproducible
      --label org.opencontainers.image.revision=$CI_COMMIT_SHORT_SHA --label org.opencontainers.image.source=$GIT_URL
      --destination $CI_REGISTRY_IMAGE:$CI_COMMIT_SHORT_SHA
  dependencies:
    - build
  only:
    - main
|
下一个阶段就是将应用程序部署到开发环境中,在 GitOps 中就意味着需要更新 Kubernetes 的资源清单,这样 Argo CD 就可以拉取更新的版本来部署应用。这里我们使用了为项目定义的环境变量,包括用户名和 TOKEN,此外在提交消息里面增加 [skip ci] 这样的关键字,这样流水线就不会被触发:
 1
 2
 3
 4
 5
 6
 7
 8
 9
10
11
12
13
14
15
16
|
deploy-dev:
  stage: deploy-dev
  image: cnych/kustomize:v1.0
  before_script:
    - git remote set-url origin http://${CI_USERNAME}:${CI_PASSWORD}@gitlab.howlinkdev.com/gitops/demo.git
    - git config --global user.email "598223084@qq.com"
    - git config --global user.name "root"
  script:
    - git checkout -B main
    - cd deployment/dev
    - kustomize edit set image $CI_REGISTRY_IMAGE:$CI_COMMIT_SHORT_SHA
    - cat kustomization.yaml
    - git commit -am '[skip ci] DEV image update'
    - git push origin main
  only:
    - main
|
最后添加一个部署到 prod 环境的阶段,和前面非常类似:
 1
 2
 3
 4
 5
 6
 7
 8
 9
10
11
12
13
14
15
16
17
18
19
|
deploy-prod:
  stage: deploy-prod
  image: cnych/kustomize:v1.0
  before_script:
    - git remote set-url origin http://${CI_USERNAME}:${CI_PASSWORD}@gitlab.howlinkdev.com/gitops/demo.git
    - git config --global user.email "598223084@qq.com"
    - git config --global user.name "root"
  script:
    - git checkout -B main
    - git pull origin main
    - cd deployment/prod
    - kustomize edit set image $CI_REGISTRY_IMAGE:$CI_COMMIT_SHORT_SHA
    - cat kustomization.yaml
    - git commit -am '[skip ci] PROD image update'
    - git push origin main
  only:
    - main
#  手动操作的流程,如果设置 when: manual deploy-prod 阶段需要在 gitlab 手动点击才会执行
#  when: manual
|
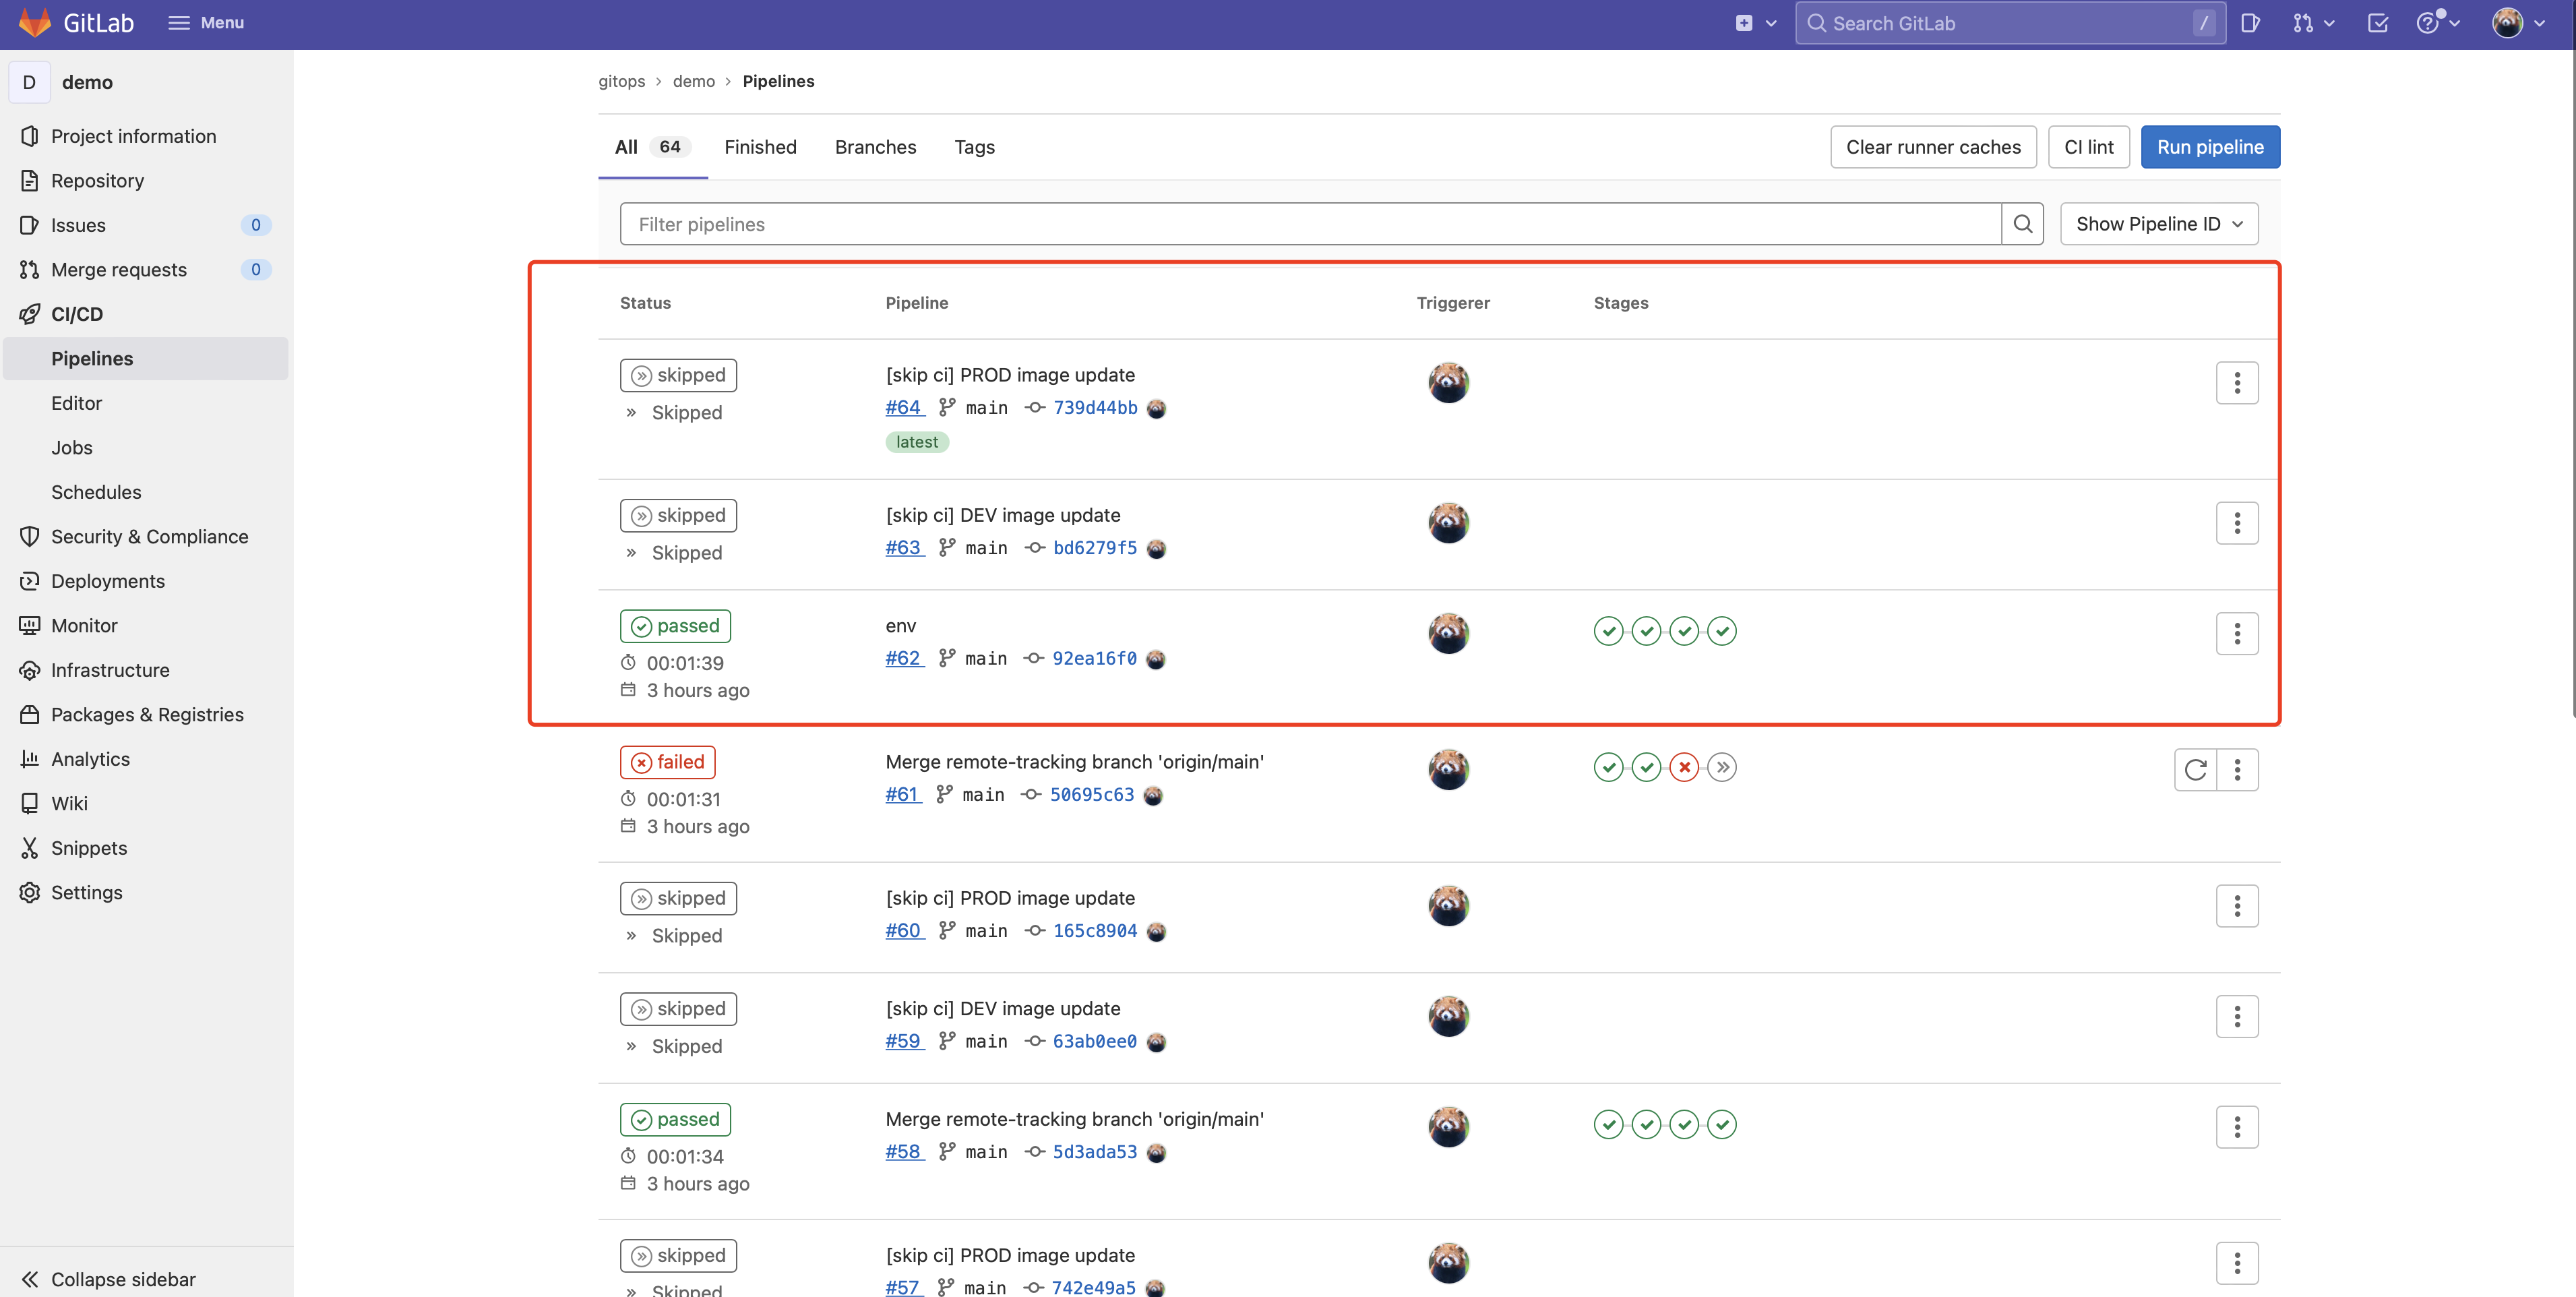
以上就是整个完整流水线的定义了,配置完成后每次上传代码都会触发 CI pipeline。

如果在 build 阶段出现报错:
1
|
413 Request Entity Too Large ...
|
这个原因是 nginx 反向代码限制了请求体数据容量,解决方式是修改 ingress-nginx 配置文件
1
|
kubectl patch configmap ingress-nginx-controller -n ingress-nginx -p '{"data":{"proxy-body-size":"0"}}'
|
我们将开发和线上两个环境的应用分别部署在了 dev 和 prod 命名空间之下,通过 Ingress 暴露服务,同样需要将两个应用的域名 http://demo.dev.howlinkdev.com/ 与 http://demo.prod.howlinkdev.com/ 在本地 /etc/hosts 中添加映射并修改 coredns 记录。

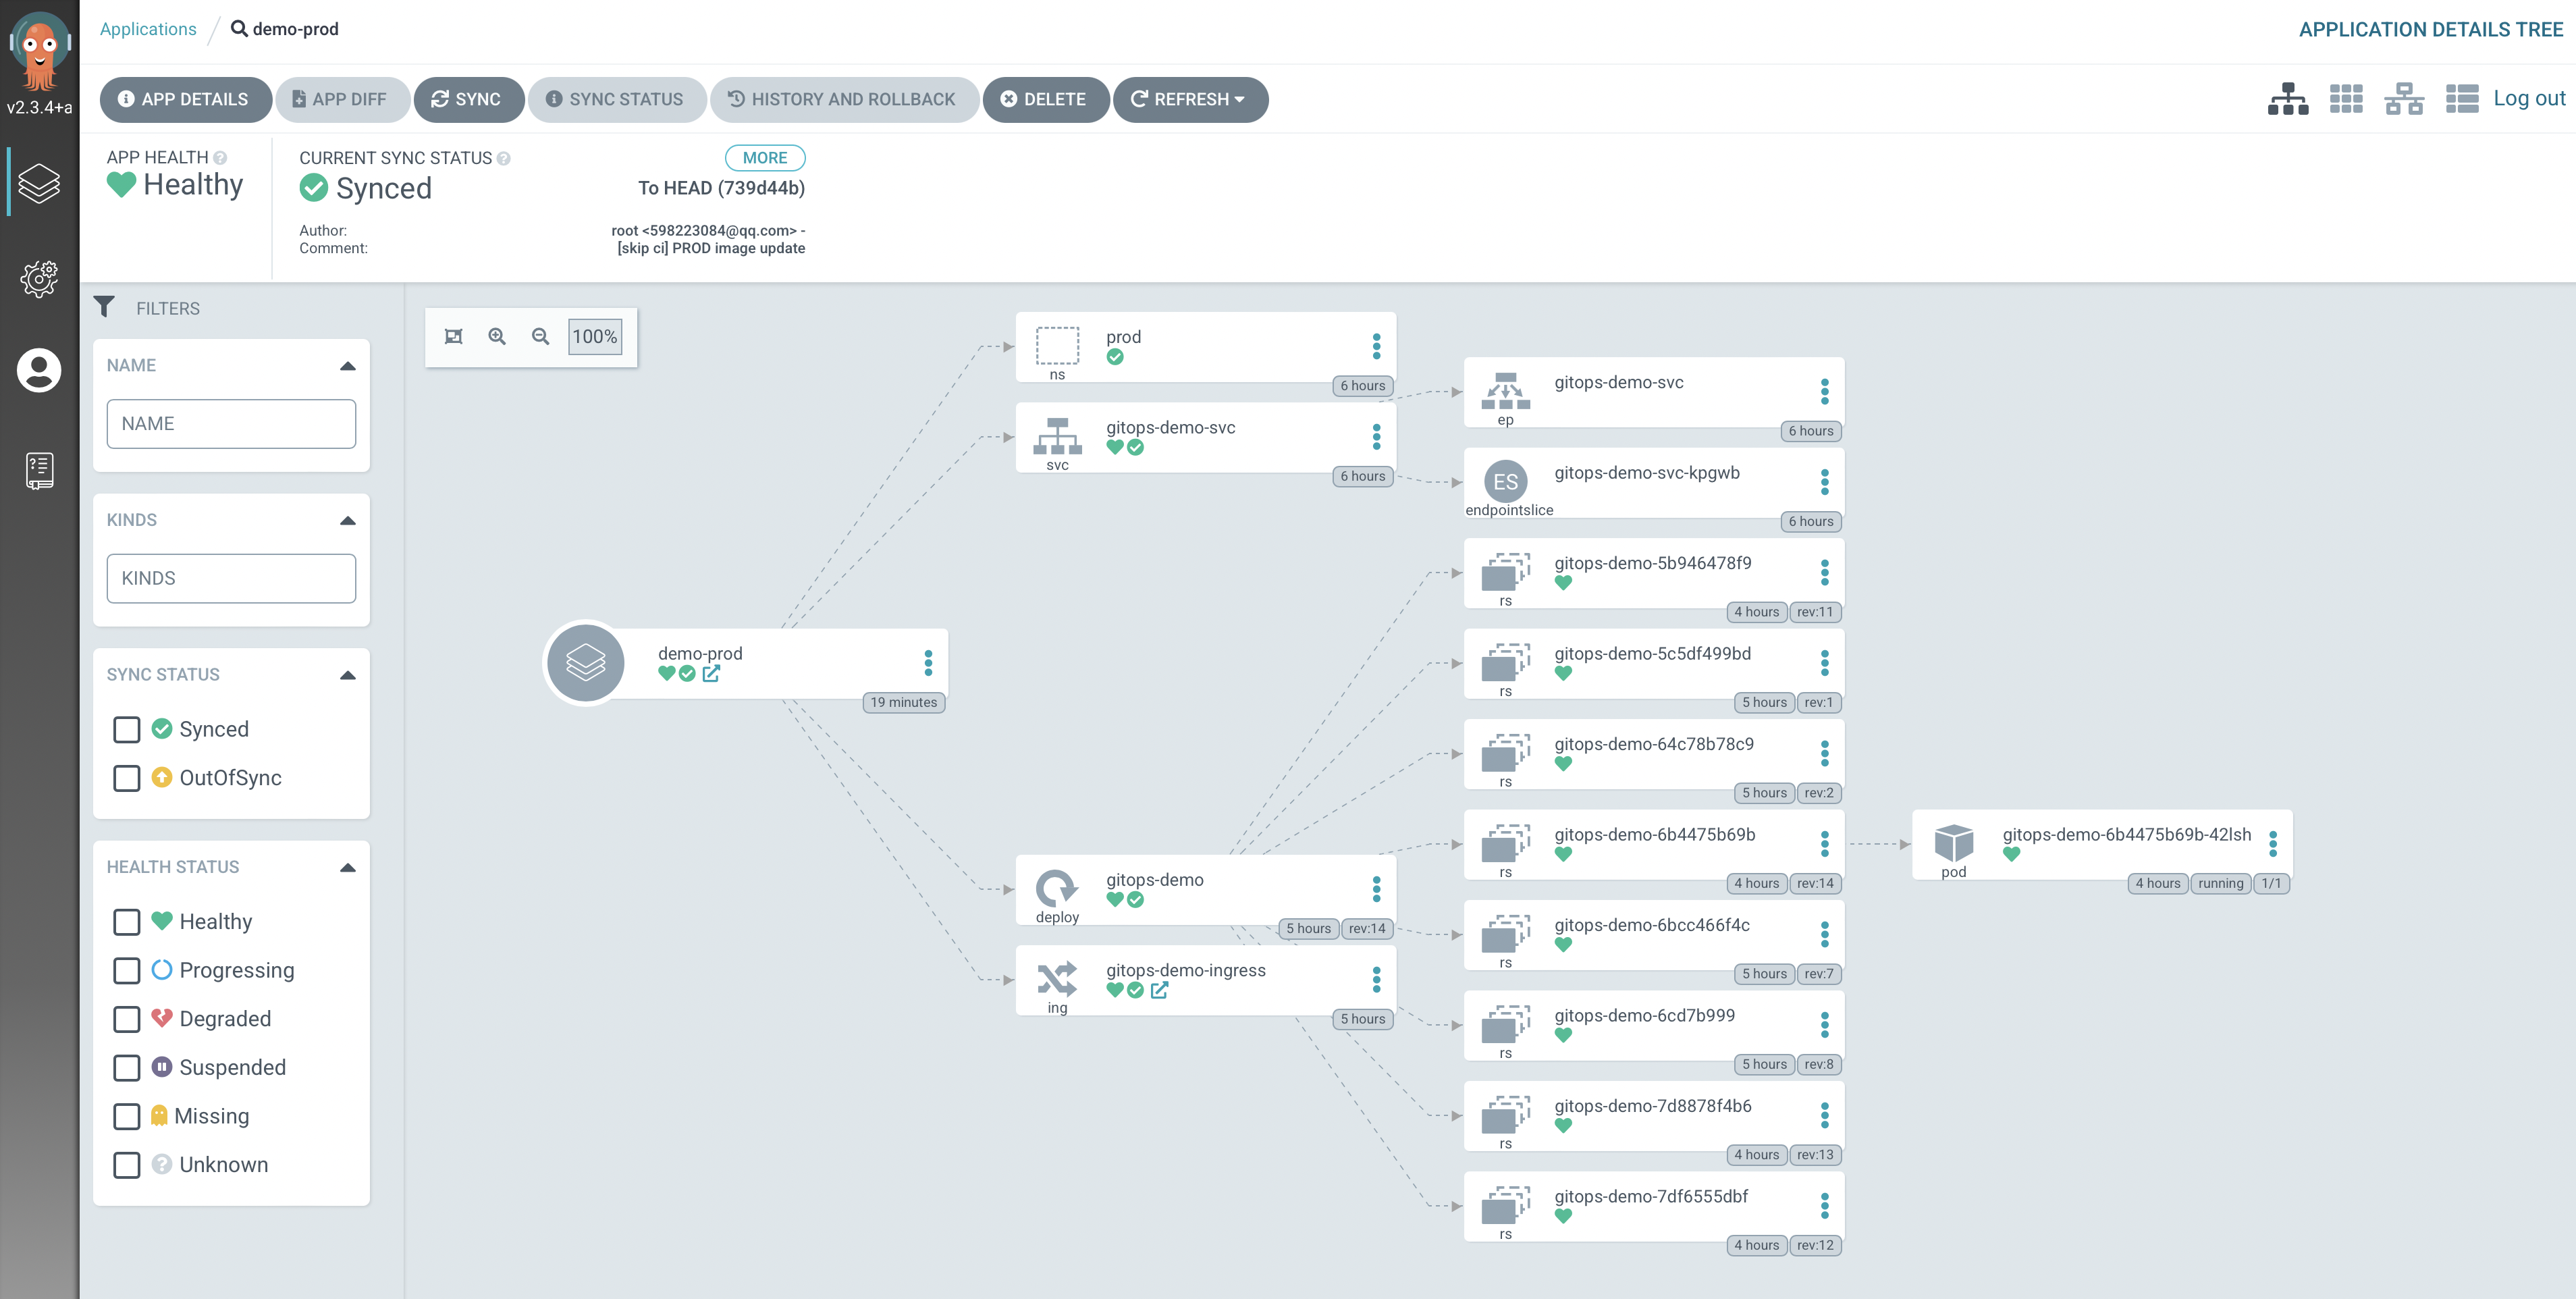
prod 环境如下:

以下是 Argo CD 更新图

如果出现 gitops-demo-ingress 同步正常,但是左上角 APP HEALTH 的状态一直显示为 Processing 的情况,可以参考 argocd gitlab
解决方式分成两步:
1.修改 gitops/demo.git deployment/<env>/ingress.yaml,加上 status 信息
1
2
3
|
# vim ingress.yaml
status:
  loadBalancer: {}
|
2.修改 argo-cd 配置文件:
 1
 2
 3
 4
 5
 6
 7
 8
 9
10
11
|
cat > patch.yaml << EOF
data:
  resource.customizations: |
    networking.k8s.io/Ingress:
        health.lua: |
          hs = {}
          hs.status = "Healthy"
          return hs
EOF

kubectl patch cm argocd-cm -n devops --patch-file=patch.yaml
|
以上就是全部的 kubernetes 1.24 上部署 gitlab + ArgoCD 的 CI/CD 流程了
参考链接

